


Hey there!
This week, I added a subscription form to my website for a plan I have for next week. I was looking for a free tool that fits my requirement to get my subscriber list going. I came across ConvertKit, which is perfect for my need.
ConvertKit provides pre-made templates on Forms you can integrate easily into your website. But I wanted something more personal.
The ConvertKit API documentation is not easy to read for inexperienced developers. So, to make things easier, let me teach you how to create a custom form and integrate it into your website.
Setting it up
I assume you already have a component implemented, but it lacks the API to function. In case you haven't made one yet, Here's mine to make things easier for you:
const Subscribe = () => {
  return (
    <div>
      <h2>
        Join the Newsletter
      </h2>
      <p>
        Join my growing list of subscribers!
      </p>
      <form>
        <input
          aria-label= "Email for newsletter"
          type={"email"}
          autoComplete= "email"
          required
          placeholder="arevalolance@icloud.com"
        />
        <button
          type= "submit"
        >
          Subscribe
        </button>
      </form>
    </div>
  );
};

export default Subscribe;
This component has three parts: the Headings, Form, and Button. Pretty simple and easy to make! Feel free to add your own stylings.
Before making the Subscribe button work, let's add a reference to the Form so we can access the email from the input field.
const inputRef = useRef(null);
To use the useRef hook inside your Form. Add a ref field to the Form and use inputRef as its value. Here's what it should look like:
<form>
  <input
    ref={inputRef} // HERE IS THE CHANGE
    aria-label= "Email for newsletter"
    type={"email"}
    autoComplete= "email"
    required
    placeholder="arevalolance@icloud.com"
  />
  <button
    type= "submit"
  >
    Subscribe
  </button>
</form>
Note: If you would like to know more about the
useRefhook, check out its documentation using this link
Creating a Subscription API
Before we finish the component, let's create an API route for our subscription feature. If you need context on how it works, check out this link.
Setting up credentials for ConvertKit
Before we start, you need the API keys from your ConvertKit account. Without this, you won't be able to make requests to their backend.
To get yours, go to this link. Alternatively, you can go to your ConvertKit dashboard and proceed to Account Settings > Advanced Settings.
Here is what your page should look like:
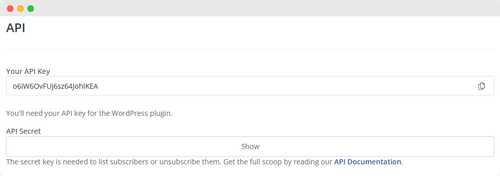
For now, all you need is your Public Key. It is labeled with "Your API Key." Save that for later.
Retrieving the Form's ID
The Form ID is essential to create a list of subscribers. To learn more about it, go to this link.
To retrieve your Form ID, access the Form you have created and click Publish. Here's a screenshot to see which part's important.
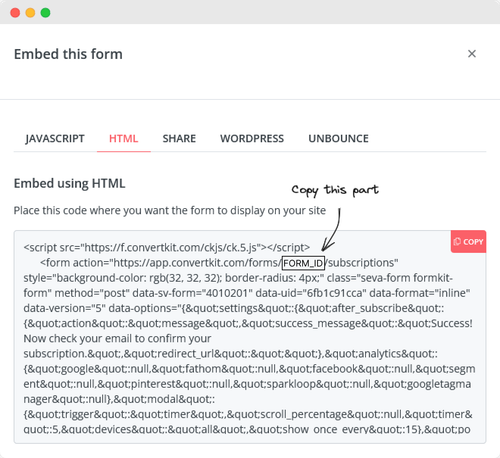
Copy what is shown in the screenshot. Save it, as you'll need it to tell ConvertKit which list the subscriber should be added to.
After you retrieve the API Key and Form ID, let's add it to your .env file.
Creating the .env file
If you don't have one yet, create an .env file inside the root of your project's folder. Inside your .env file, add the following code:
CONVERTKIT_API_KEY=<YOUR_API_KEY>
CONVERTKIT_FORM_ID=<YOUR_FORM_ID>
Creating the Subscription API
To create a new API route, create a new file inside the pages/api folder called subscribe.ts. This will contain the code that communicates with ConvertKit for adding subscribers.
You've done so much hard work; let's make this part easier. Here is the code for the Subscription API.
const handler = async (req: NextApiRequest, res: NextApiResponse) => {
  const { email } = req.query;

  // Reads the credentials from your .env file and stores it into variables
  const FORM_ID = process.env.CONVERTKIT_FORM_ID;
  const API_KEY = process.env.CONVERTKIT_API_KEY;
  // This is what needs to be submitted to ConvertKit's API
  const FORM_DATA = { api_key: API_KEY, email };

  if (!email) {
    return res
      .status(400)
      .json(JSON.stringify({ error: "Email address is required" }));
  }

  const result = await fetch(
    `https://api.convertkit.com/v3/forms/${FORM_ID}/subscribe`,
    {
      method: "POST",
      headers: {"Content-Type": "application/json; charset=utf-8"},
      body: JSON.stringify(FORM_DATA),
    }
  );

  if (result.status >= 400) {
    return res.status(400).json({ error: "Something went wrong." });
  }

  return res.status(200).json({ success: true });
};
This part of the code relies on this part of ConvertKit's documentation. If you're interested in learning more, take a visit.
Implementing the Subscribe Button
Now that we have the Subscription API implemented let's make the Subscribe button work. For this, we'll have to create an async function called subscribe:
const subscribe = async () => {}
The subscribe function is marked async since we'll be doing a fetch call to the subscribe API. You can use other tools such as axios, but for this part, the `fetch'API is enough.
const subscribe = async (e) => {
    e.preventDefault();

    const email = inputRef.current.value; // Retrieves the email from the input form
    // Creates a POST call to our previously created API route.
    const res = await fetch(`/api/subscribe?email=${email}`, {
      method: "POST",
    });

    // Your custom state handling for error and success messages
    ...
}
As you can see, it's as easy as it gets. All you need to do is to submit a POST call to the API route we created, and that's all. Your visitors can now subscribe to your subscription list.
Last thing to do is to add it to your Form component as a value for the onSubmit listener. This enables the subscribe function to run whenever a user submits their email.
<form onSubmit={subscribe}>
    ...
</form>
Conclusion
To conclude, we have discussed in the most basic manner how we could integrate ConvertKit's Form Subscription API into our Custom Subscription Component. It may be confusing at first, but if you follow the steps provided, you'll be able to set it up in no time!
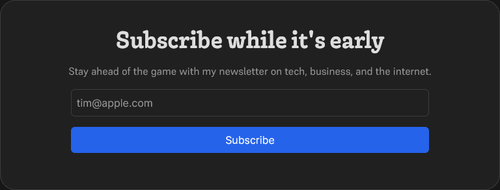
Here's a sneak peek at what it can look like with CSS added.
Thank you for reading! If you have questions, just let me know in the comments.
In the meantime, come and follow me on Twitter! Also, don't forget to subscribe to my newsletter here in Hashnode for more helpful tutorials like this!